The Guest Relation Profiles are used to record general information such as name, address, language, contact details etc. In a multi- property database, Guest Profiles can be shared with the other properties.
To access Guest Relation, use the key combination <Ctrl> + <G> or go to Relation > Guest.
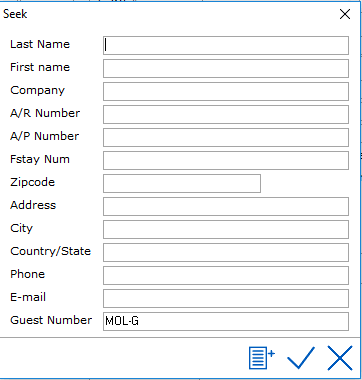
The seek window will be displayed. At least one criteria must be given.
All relevant information relating to the guest can be entered in the guest relation profile . Entering the guest name (Last Name) in the Name field in the reservation screen or rate query screen and then pressing the <tab> key is the command for IDPMS to search for any guest names that correspond with the name that has just been entered.
If Yes is selected, IDPMS will display the guest profile. The rest of the guest data can then be entered. The profile's unique number is displayed at the top of the guest profile. Guest profiles are indicated by the combination XXX-G. XXX identifies the hotel's designated relation code and the G stands for Guest. In the example below the guest number is MOL-G14058. MOL relates to the hotel relation code as assigned under Option General.
It is possible to enter a status for a guest. Cash List and Black List can be selected. These options only relate to the manner in which the guest will pay. If a guest is given Cash status, he or she will only be permitted to pay in cash. It is not possible to make any further reservations under the names of guests assigned Black list status. These guests are not permitted to stay at the hotel overnight. Most guests will remain without a status .
The Guest profile
The Name is the only mandatory field by default in the guest window. However, many hotels choose to make many more fields mandatory and require their users to capture that information. To make fields mandatory, see Mandatory Field.
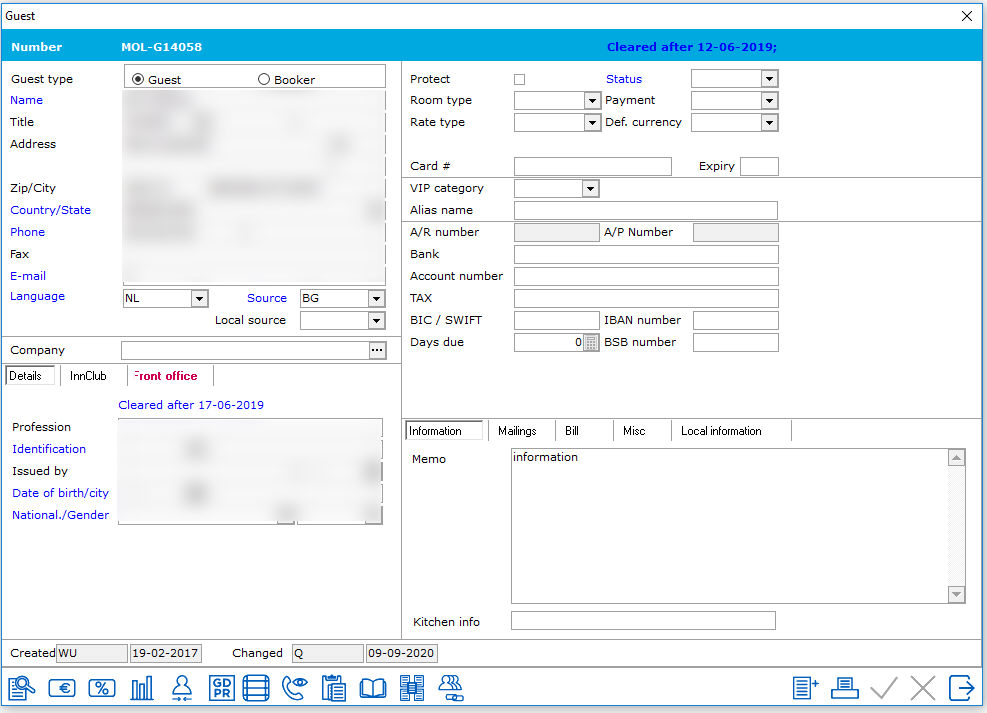
Guest contact information fields
It is important to enter the correct information in the appropriate field as it effects how data is stored and printed from the database.
Guest type - Select Guest or Booker.
Name - The guest name entered will be displayed in the Name field. It is still possible to change the guest name in this field.
Title - The guest's title can be selected from the titles picklist. See Titles. The adjacent fields is where the guest's first name and infix can be entered.
Address - Enter the guest's address in the Address field. The first line of the address is always used to send letters of confirmation and invoices. The second line is used for the entry of an alternative address, and the small fields are for the numbers.
ZIP - Enter the postal or zipcode code in Zip. IDPMS will then automatically enter the correct city. This only applies for addresses in the Netherlands, US and Canadian postal codes. The postal code must be entered in the exact format of the country.
City - State or province will be filled automatically and if the countries are linked in the state table, the country field will also be populated. All Guest profiles must have a country linked.
Country /state - The guest's country of origin can be selected in the Country field. See Country.
Phone - The guest's telephone number is entered in the Telephone field.
Fax - The guest's fax number is entered in the Fax field.
E-mail - The guest's email address can be entered in the Email field.
Language - The guest's language must be selected in the Language field. This relates to letters of confirmation and invoices.
Source - The Source field can be filled if the guest uses the same source each time a booking is made. if not, leave it blank. See Source.
Local Source - Local Source is used in a multi- property environment if the local hotel has a different source list that the central database source list. Most hotels do not use this field.
The company name entry field

Company - The company that employs this guest or to which this guest is affiliated can be entered in the Company field. A new company profile can be created if the company name entered here is unknown. When the guest in question makes reservations at this hotel in future, the company data will be entered automatically. If the guest is not associated with a company, this field can be left blank.
Fields for other guest data - Details Tab.
ID information can be entered and stored in this section if this type of information is required by the hotel. This information is not required data entry and will depend on the hotel's policy. It is also possible to make the Identification field mandatory.
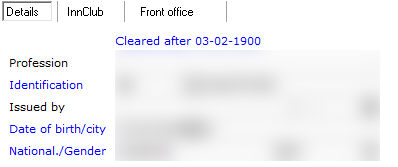
Profession - Some hotels may want to store information on the guest's profession. (e.g. Doctor, Truck Driver,Lawyer, Builder, Policeman etc..)
Select the manner in which the guest identified him/herself in the Identification field. The relevant passport or driver's licence number can be entered in the adjacent field. ID types were created in a picklist at setup. For more information on ID types, see ID Types
Enter the date on which the ID type was issued and the issuing municipality in the Issued by field.
Enter the guest's date and place of birth in the date/place of birth field.
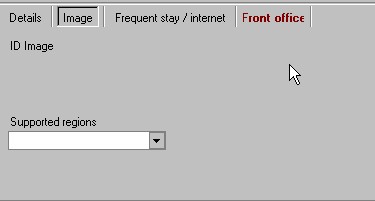
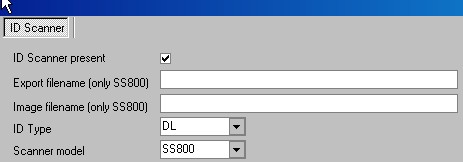
The image tab is visible when the ID scanner interface is activated in settings->Option->Third Party & Interfaces->ID Scanner
Supported Regions -
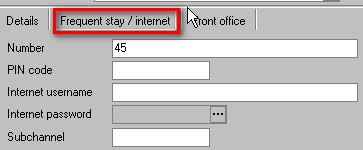
Number - A frequent stay number can be entered here or if the hotel uses the loyalty program in IDPMS, numbers are automatically assigned by selecting the generate frequent stay number icon 
Pin Code- Customers that use CWI (Customer Web Interface V 1) have the ability to assign a pin number to access their profile. This number is stored here.
Internet username - Customers that use CWI V2) have the ability to assign a username to access their relation profile in IDPMS via the website and this information is stored here.
Internet password- Customers that use CWI V2) have the ability to assign a password via the website and this information is stored here.
Subchannel - Currently, this field is not used.
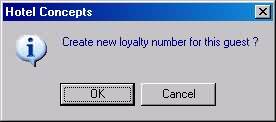
Creating a new FS number
The Front Office tab:
The FO message field is used to enter text and information relevant to a guest stay. Once text is entered, the font will change to red on the tab. This message window will pop up each time a reservation is booked for this guest. The message will also appear on check-in, checkout and copying of folios for the guest.
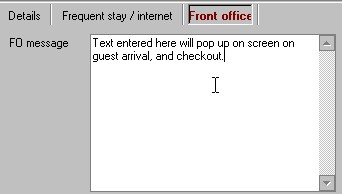
Example of pop up FO message:

Fields for specific guest data

Protect can be check marked if this guest profile may not be changed by an unauthorized user. Only a system administrator (super user) may be permitted to remove the check mark at a later date.Access is based on access rights set up in menu user access rights. The right is under Reservation Rights - "User can edit relation profile" This profile may still be changed in future if the box is not check marked.
Specific room types can be selected in the Room type field. This room type will then be automatically selected as standard on each subsequent occasion that this guest makes a reservation.
Specific rate types can be selected in Rate type. This rate type will then be automatically selected as standard on each subsequent occasion that this guest makes a reservation.
The standard payment method can be selected in the Payment field. This payment method will be automatically entered as the standard payment method every time this guest makes a reservation.
Def. Currency - A default currency can be linked to a relation profile. The currency types and maingroups need to be created first. See Exchange Rate. Once a currency is selected, the relation's bill will be converted to this default currency. Note- A special form of the invoice.rpt report needs to created to accommodate this functionality. The invoice exchange details are saved in the invoice_history table in the database. If the Def. currency is left blank, the invoice and billing for the relation will be in the local currency of the IDPMS system.
If the guest is paying with a credit card, the card number can be entered in the Card field. Note, in a PCI compliant environment, the card number will be visible and accessible only to those users with the assigned rights.
The expiration date of the credit card in question can be entered in the Exp. Date field.
VIP Category can be assigned to a guest. The VIP category list is determined by the hotel and is customizable. See VIP Categories for more information.
Alias Name- can be assigned to those guest that wish to be recognized under a different name and not use their given name. Note if an alias name is used, then the system will only find the guest under the new alias and not their real name.
Fields for other payment data :
 Clicking on the AR number icon will create and assign an AR number. This AR number will be permanent and then filled in the A/R number field. The number will automatically be assigned by the system unless in settings->Options->Financial(2), the 'External debtor number is checked. If it is checked, then the user is required to manually assign an AR number. If DB (direct Bill or AR (accounts receivable) are the method of payment used on a guest booking, where no AR number is assigned, then the system will not allow that form of payment without a valid AR number. Most hotels require credit checks before authorizing any guest to have direct billing rights and an AR account.
AP number is used if the relation has an accounts payable account. This might only be used in a guest relation profile if the property uses the Trust Owner Accounting Module in IDPMS.. AP is also used for travel agent commission handling in Agent Profiles. The AP number field automatically is filled based on the functions of those modules (Trust Accounting and AP commission handling)
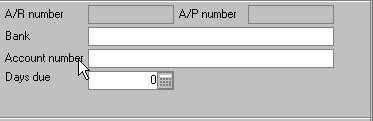
Enter the bank with which the guest has an account in the Bank relation field.
The guest's account number can be entered in the Account no. field.
The various tabs will be discussed as the final elements of the company profile. These are Information, Freq. stay, Mailing, Account, Kitchen and Sales.
Trust Accounting

If a hotel/property uses the IDPMS Trust Accounting module, these fields may be activated. Trust Accounting is a module in IDPMS that requires a valid license and is used in conjunction with Accounts Payable Module. See Owner Trust Accounting for more information. If the guest is a Trust Owner (owns rooms), this box can be checked. If the guest is a trust owner(owns a room(s) at the property) , this box needs to be checked. The room or rooms that the guest owns are linked to the profile using the  icon at the bottom of the Guest window. Once a start and end date are entered, the 'Active' box will be checked. See below for more details on adding trust accounting rooms .
The Information tab
Extra information on this guest can be entered in the Information tab by clicking in the memo window. The information can be recorded on the guest profile and will be displayed on each occasion that this guest makes a reservation.
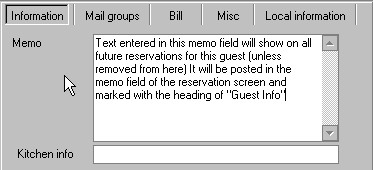
To remove memo text, highlight the text and push the delete key. Save the guest profile to update the change.
Kitchen info:
Any extra kitchen information, e.g., a diet, can be selected (if entered) in the Kitchen tab. This information will be displayed on the relevant F&B lists.The information entered here will be displayed in the kitchen menu every time this guest makes a reservation.
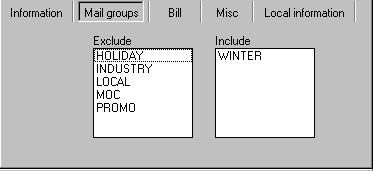
The Mailing tab
The mailing tab works with the Mailing Wizard tool in IDPMS. It allows the user to link a guest to specific mailing and when these mailing are selected using the mailing wizard, guests that are linked, will be included in those mailings.
Indicate the mailing selections in which this guest may participate in by dragging and dropping to the right window marked 'Include'. If nothing is in the 'Include' pane, this means that the guest is not included on any specific mailing lists. To remove a guest from a mailing list, drag the mailing selection back to the 'Exclude' pane.
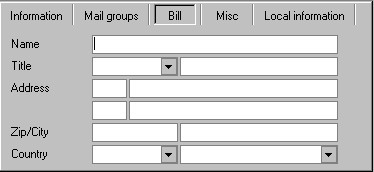
The Bill tab
An alternative account address can, if applicable, be entered in the Bill tab. IDPMS will then use this address instead of the postal address on billing.
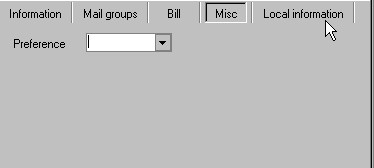
The Misc tab
This tab is filled with any user defined guest fields created by the hotel. It is customizable. To get more information on creating User Defined Guest Fields, see User Defined Guest Fields
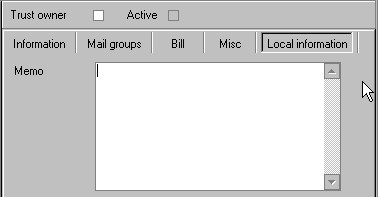
The Local Information tab.
This is used in a multi- property environment where local memo text can be linked to a guest relation and will not be up loaded or replicated to other properties linked in the database. The information remains local to the hotel and visible only within the property. This 'local' option needs to be activated if a hotel wants to use it. It can be activated under, Settings->Options->Modules - > 'Use local rates and info'
A number of icons are displayed at the bottom of the guest profile. These are explained in more detail below.


 This icon is used to seek/search other gust relation profiles.
 This icon is used to create an AR number. The Ar number is assigned automatically and stored in the A/R number field in the Guest Relation. Guests assigned an AR number will then be allowed to settle their account to Direct Billing or AR (Accounts Receivable) at checkout. Those wishing to use that form of payment without a valid AR number will not be allowed.
 This icon is used, if applicable, to create a frequent stay number. This number will then be grayed-out in Number in the Freq. stay/Internet tab.
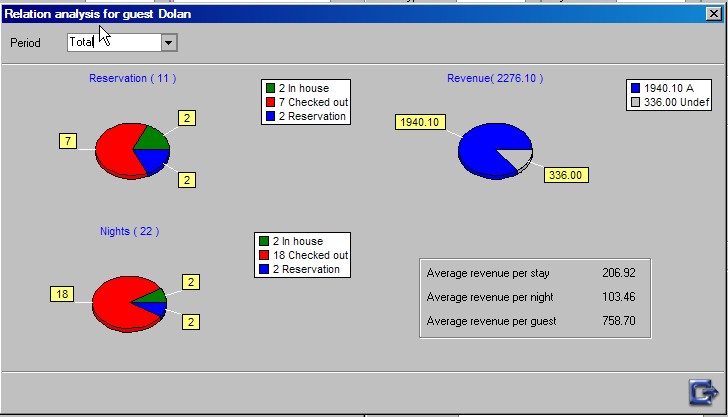
 This icon displays an analysis on the guest's bookings and revenue. Specific periods can be selected and viewed.
Example of an analysis with data:
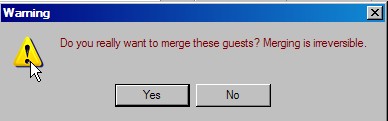
 This icon is used to combine/merge two guest profiles. Clicking on this icon commands IDPMS to ask for another guest name or folio number. All the information on the selected guest will then be transferred to the new guest profile. Once the option to merge profiles has been chosen and completed, it cannot be undone. A warning will appear as follows:
 This button will give users access to different GDPR related options:
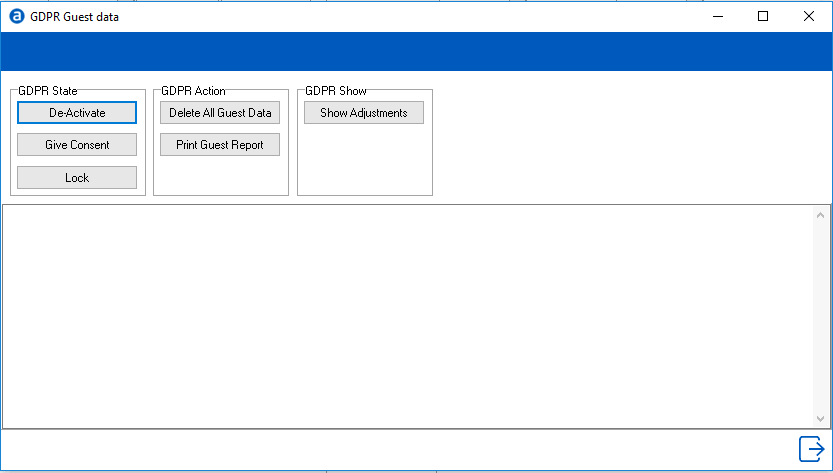
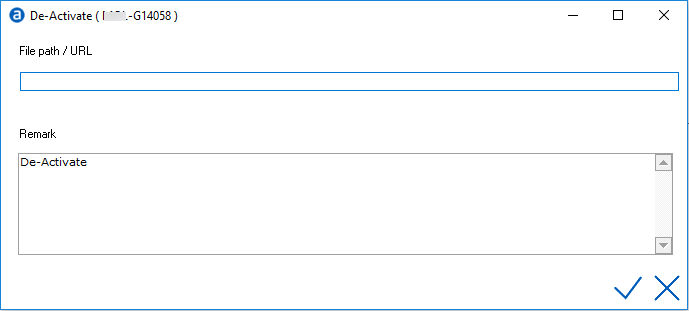
De-activate/Activate - Individuals have the right to ‘restriction of processing’ of their personal data. If a guest wants to have his profile deleted, but it cannot be deleted yet (for example because of the retention policy for invoices) the contact profile can be deactivated. Once deactivated, the profile will no longer be showing in IDPMS when performing a normal profile search. The profile will still exist in the database and can be found when searching through a specific menu item and requires a user right to do so. A file path to a document requesting deactivation as well as a remark can be added.
Lock/unlock - When a contact profile has been locked, it cannot be removed or edited. When clicking on ‘Lock’ the button will change to ‘Unlock’, so the profile can be unlocked when needed. Locked profiles will also not be deleted by the automatic purging process. In case of a dispute (for example about accuracy of the personal data or if the processing is unlawful but the guest objects to erasure) users can lock the contact profile until the dispute is resolved. A file path to a document requesting lock or unlock of the profile as well as a remark can be added.
Consent - Will provide the possibility to log consent. The network location of the document in which consent was given can be entered and will be stored after which consent will be logged.
Delete all guest data - Deletes the complete profile from the database.
Print Guest Report - Produces a report that contains all data stored for the profile. This report can be exported to a PDF or Excel file to be able to deliver an electronic format to the data subject.
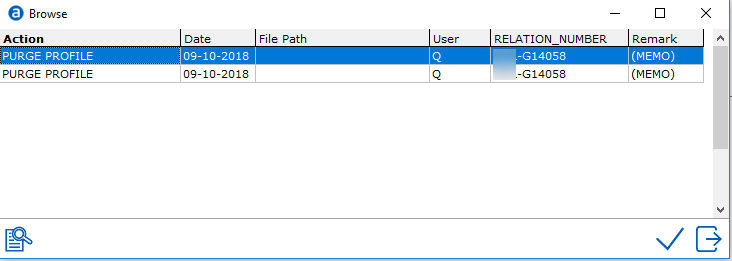
Show Adjustments - Will give an overview to all GDPR related actions that have been performed to the profile. For example:
This icon is only available if the Trust Accounting Module is licensed and used. The icon is used to add rooms to a Trust Accounting Owner profile. Once the Trust owner box is checked, the icon is available to add the room numbers. The following window appears when the icon is selected:
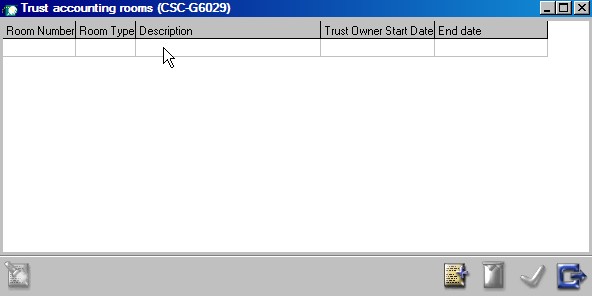
To add a room, select the add icon 
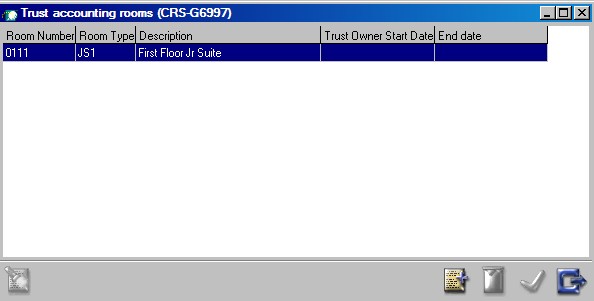
Each room added will be listed. To enter the start and end dates for room ownership, double click on the room number(s) to add dates:
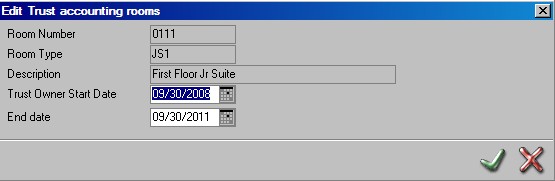
Once a start and end date have been entered, the 'Active' box will be checked in the guest profile next to the Trust Owner box 
 Use this icon to view the history of the guest in question.
This is a list of all reservations made with this guest profile including in-house folios, checked out and cancelled per property.
 This icon is used to trace all contacts between a member of the sales staff and a guest. This is a contact management option that is not always active. Whether it is active or not depends on the rights assigned to the user and whether the licence for this module has been activated. These appointments can then be printed out. See Contact Manager for more information.
 This icon copies the relevant address data to the clipboard (memory). Selecting paste in a word processing application such as Microsoft Word will copy the data into the current document. This icon can therefore save a considerable amount of time when creating letters or conducting other communication.
 This icon is for the guest communication log. Here one can review the recorded information and add new information. See for more info Guest communication log
This icon is used to add another 'new' guest profile.
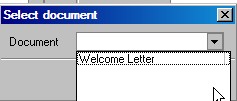
 The printer icon within the relation profile window is used to open a document from editor. An example may be a welcome letter. The letter first needs to be created in editor and then added to the confirmation list. See Confirmations
Once the print icon is selected the following window will appear where the letter can be selected from a picklist created in Confirmations:

At the bottom of the relation profile window, there are two fields that show Created and Changed.
Created will identify the user that created the relation profile initially. The date created is also noted.
Changed - will identify the user that made the last change including the date of change.
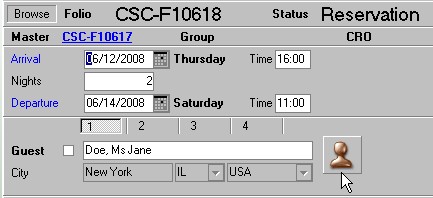
 This icon is now displayed on the left of the Guest section of the reservation window. Use this icon to access the guest profile in order to make any changes that may be required.
See Reservation Screen example below: