To access an A/R account, go to Back Office > Accounts Receivable > Accounts, or use shortcut is <Ctrl> + <A>.
Note: A/R Accounts are first created as a Relation (Guest, Company or Agent) See Relation. Once an A/R number is assigned to the relation profile, the Account will be available in Accounts Receivable.
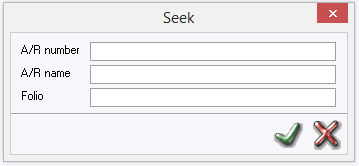
Accounts search field will be displayed:
In this window, the user can search by A/R account number, A/R name or folio number.
Use the green checkmark or <Enter>.
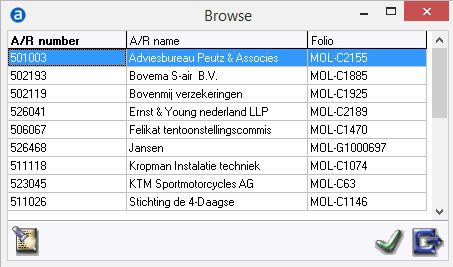
The following window appears in response to entering a search instruction. Select the A/R and confirm by using the green checkmark or <Enter>.
A/R selection field
After the selection, the A/R overview appears for the selected A/R.
A/R overview
The company's details, all address details, any price agreements and other details that may also be found on the company profile are displayed in the middle of this window.
AR address details
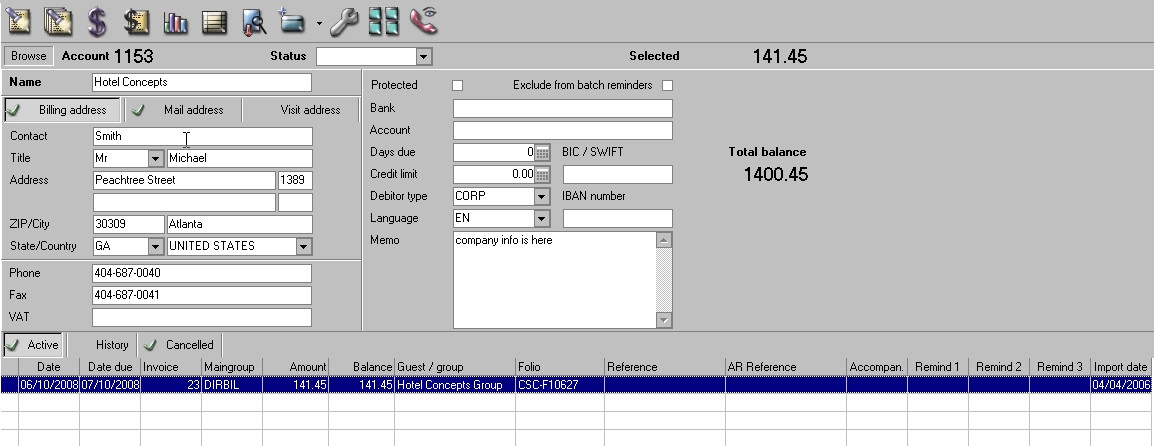
Account - displays the A/R Account number that was assigned to the relation profile.
The status can also be determined with reference to the payment behaviour of the A/R concerned. A status can be, for example "No Credit" or "Cash". If a status is assigned in the relation profile, it will be active in the Accounts Receivable account. For example a status of 'Black list' assigned in the relation profile will show as ' No Credit' on the Accounts Receivable Account. 'Cash list' will show as 'Cash '. A no credit status will block any reservations with this A/R account number.
Three tabs are given under the company name for the invoice address, the Billing address, the Mail address the Visit address . If something is changed in the A/R details, this must be confirmed by clicking on the green check mark in the upper right. The address information is copied from the relation profile.
Protected - If checked, only users with rights can make changes to the AR account. Access rights are designated under Menu User Access
Exclude from Batch Reminders- If checked, this AR account will be excluded from the printing of batch reminder letters. See Batch print reminders for more information.
For days due, the number of days after which a reminder letter must be sent can be set. This deviates from the number of days due set in the Financial (2) settings. Option Financial (2)
A credit limit can be entered when agreements have been made about this. The total balance will show in red when the total amount of the outstanding invoices exceeds the given credit limit.
The language in which the reminder letters must be printed can be indicated under language.
In addition, the total balance of all the AR outstanding invoices is displayed.
Selected displays the total of invoices selected (highlighted)
Memo - Specific information about the AR account can be entered in the memo text field. If there is memo text in the memo of the Relation Profile, it will also display in the memo field of the AR Account. Memo text entered in the AR account memo will not copy back to the memo field in the relation profile.
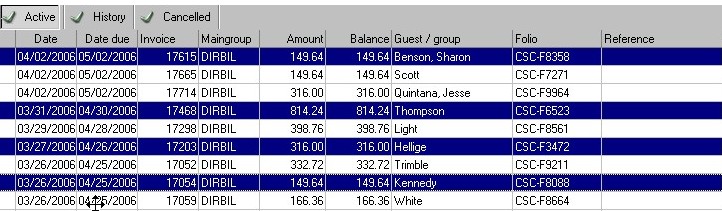
The lowermost part of the window gives an overview of the outstanding invoices (active), the already paid invoices (history) and cancelled invoices (cancelled). By clicking on one of the three tabs the related invoices will be displayed. If no invoices are present the tab will not show a green checkmark. If invoices are present, the green checkmark will be displayed on the tab title.
Invoice overview

By right clicking on an active invoice, the following menu will be displayed:
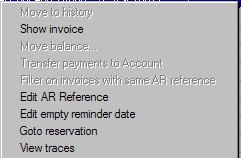
Move to History is greyed out since the balance is still active and not $0.
Show invoice - By selecting this option, the invoice detail will be shown.
Move Balance- is active if there is a balance 'post to account'. Post to account' refers to a payment that has been posted to the overall AR account and not applied to a specific invoice.
Transfer Payments to Account - A payment can be transferred to another AR account.
Filter on invoices with same AR reference. - This allows the user to filter and display invoices that have the same AR reference (in the AR reference column)
Edit AR reference - By clicking on this option, an AR reference can be entered or edited for the selected invoice.
Edit empty reminder date - Reminder dates are normally automatically filled based on the settings made in Settings->Options->Back Office. However, the user can overwrite the dates by selecting which type of reminder and entering the new date.
Goto reservation - By selecting this option, the reservation screen for the selected folio will be displayed.
View Traces - By selecting this option, any applicable traces for the folio will be displayed. See Contact Manager for more information on Traces.
Accounts Receivable Icons
 Seek A/R (F3). If, for example, the wrong AR is selected, the search window can again be opened using this button.
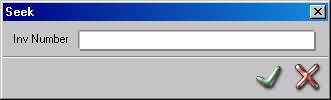
 Seek invoice (F4). This button opens a window in which a search can be performed using an invoice number.
Search window invoice number
 Entry window (F6). Used to post charges to a specific invoice or to account.
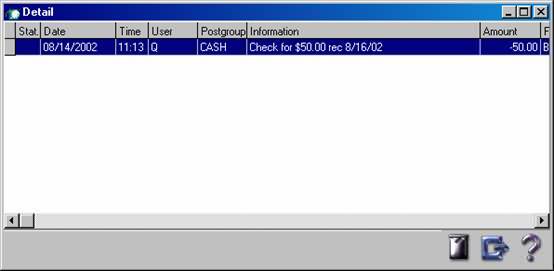
 Detail window (F5). The details of the chosen invoice are shown in this window. This can also be achieved by double clicking on the chosen invoice in the lowermost part of the window. An invoice transaction can be removed/voided in this window by clicking on the recycle bin.
Invoice details window
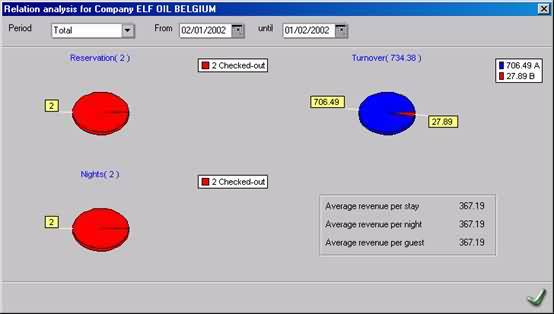
 Business analysis. The statistics of the AR that is selected are shown here. Further details can be entered here, e.g. a time period.
Business analysis
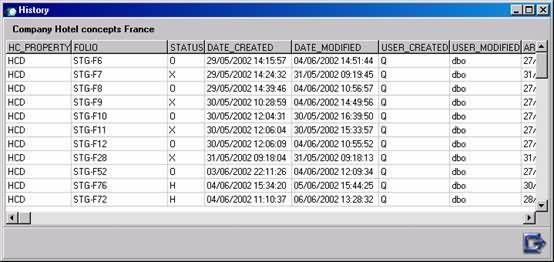
 History. The entire business history can be found here. Which guests have stayed in the hotel and how long they have stayed, etc.
Business history
 - Transfers to another AR Account. If an invoice is allotted to the wrong AR, it can be transferred to the correct AR using this button. This is achieved via a number of steps: firstly, select 1 or more invoices at the bottom of the screen and then click on the transfer button. A search window opens again followed by an overview. Select the correct AR and click on the green button. An option verifying if the transfer should occur will pop up. If this is confirmed, the invoice(s) shall be transferred to the selected AR.
 If postings need to be processed via credit card (and a credit card interface is in use) this option is used. All credit card details are also displayed by selecting this option or <CTRL>F7
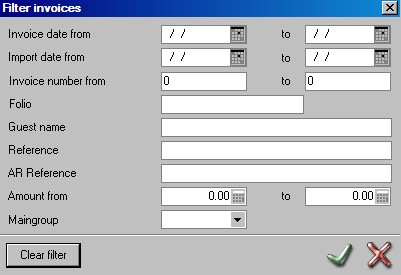
 This is used to filter invoices. If there are very large AR accounts, it is useful to select and filter invoices. Invoices can be filtered on date, amount, folio, name etc..
 This icon is used to change the view on the screen. It suppresses the top half of the screen. To return to normal view, click on the icon again.
 This icon is used to enter or edit a trace on the AR account.
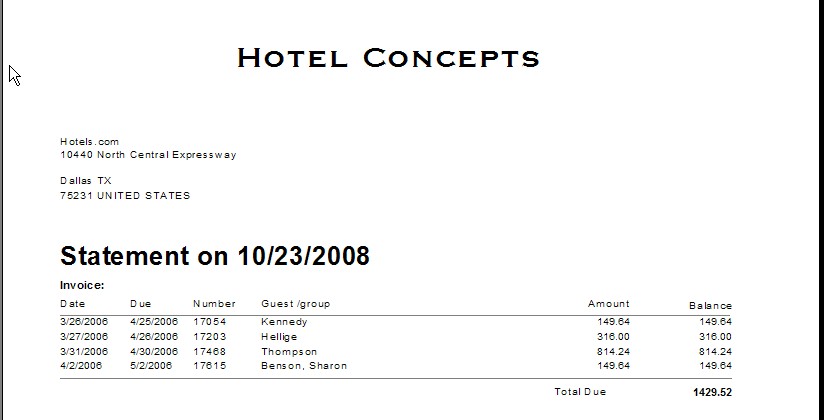
 By selecting the print icon or F10 , a statement will be created for the selected invoices. An example is shown below where 4 invoices are selected using the <CTRL> key and selecting each one.
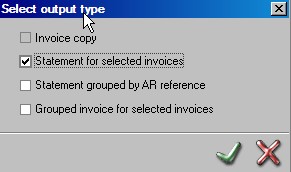
Example of Statement