
This chapter explains Users in the APMA portal. It is part of the Settings menu and can be accessed via Administrator > Settings > Users in the Portal Sidebar Menu.
This menu item is restricted
and available to APMA Portal SuperUsers only.
The APMA portal has different user types:
Profile information can be obtained through different routes in APMA Portal:
This page explains user management for Customer (Super) Users. It includes:
User did not receive activation email
User did not receive DUO message and/or activation link is expired.
User get's the message 'Locked out'
User gets the message 'Disabled'
User changed role/function and needs other access rights
User can login to the portal, but not in FullPMS
Navigate to Administrator > Settings and select the Users tab
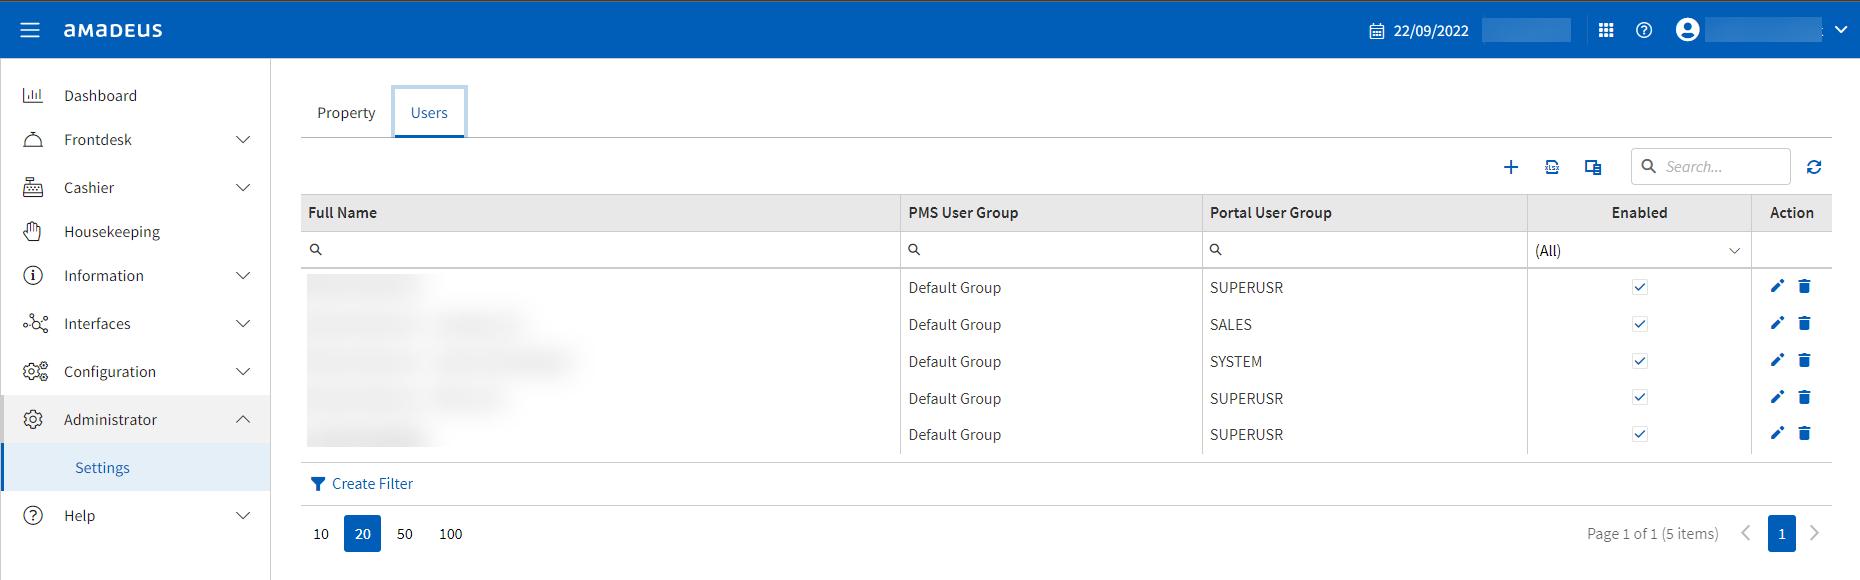
This opens the user overview page of the selected property. All users that have access to the specific property are displayed.
You can search on:
Full name - first name, last name
User group - assigned group
Status - enabled (true) or disabled
(false)
From the user overview you can add a new user by clicking on the + sign.

This will open a new page, where you can fill in the user details. Always start with filling the email address as this is the basis of the APMA account, until this is filled all other fields will be greyed out.
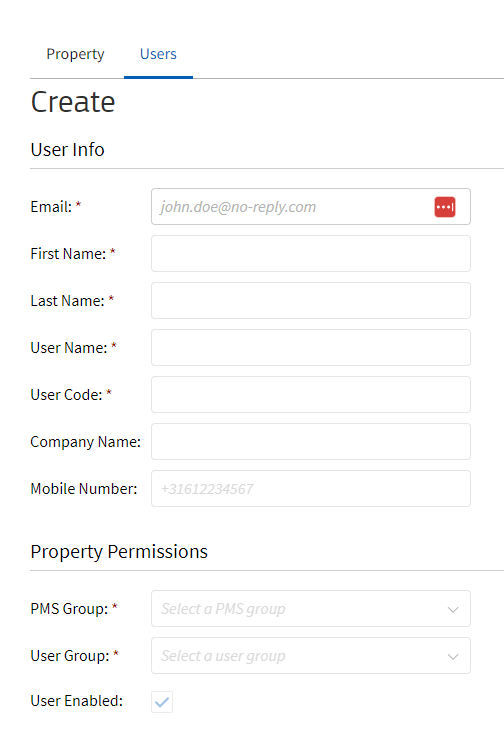
Not exists > please continue filling the rest of the user details
Does exists > then email will be found and no user details needs to be filled in. Only property permission will need to be filled in if the user already exists and not yet linked to the property.
Mandatory
field.
Superuser
FrontOffice Management
FrontOffice
Banqueting Management
Banqueting
NightAuditor
Housekeeping Management
Housekeeping
User Group - User groups are the standard portal groups that can be assigned to a user based on their role. Mandatory field.
Superuser
FrontOffice Management
FrontOffice
Banqueting Management
Banqueting
NightAuditor
Housekeeping Management
Housekeeping

Here you can see and edit basic user details.
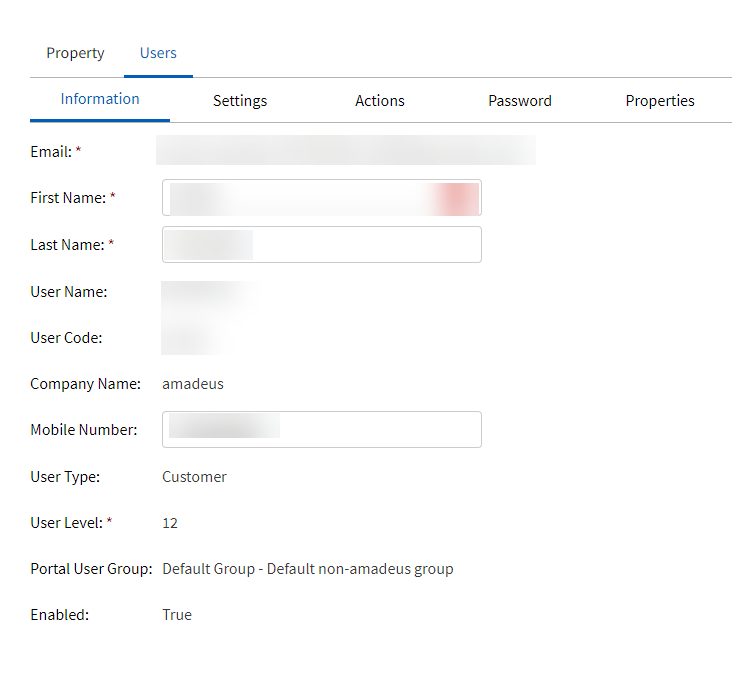
First name - For example John. Users first name can be edited.
Last name - For example Doe. Users last name can be edited.
Email - For example john.doe@no-reply.com. Login for the APMA portal. Not allowed to edit as email is the base of the APMA account. In case an incorrect email is used, please create a new account and delete the incorrect one.
Phone Number - For example +31620000000. Phone number used for DUO activation. This is editable for when the user has a new phone number. When the phone number is updated you will receive a DUO message on your phone to install/activate DUO. This is mandatory for PCI-DSS compliancy, as this requires 2-factor authentication when dealing with sensitive (credit card) data.
Enabled - True. Status of the account. If you want to disable a property for a user, go to the properties tab and manage from here. If you want to completely remove a user, click on the trash bin in the main user user overview. If you want to disable the user, disable the user . If the user is disabled all properties will be disabled. If for any reason the user is enabled again, the properties will not be enabled. These would need to be enabled manually one by one.
Click on save, to save your changes and you will see a success message pop up.
In the settings tab here you have the possibility to add the users preferred language , localization, time zone and preferred property. Only Amadeus users with enough user rights are able to add/change the settings. Customer super users are able to add the settings for the users of a property for which the super user has access to.

Language - To change the language for a user, go to settings tab and choose a language. If no language is set , language will be defaulted to English.
Localization - Based on the language chosen it is possible to set localization of the language meaning that if English is chosen and property is located in Great-Brittain then English (en-GB) can be chosen and this will then translate the portal in the correct English chosen. So date format, time format will changed based on the localization chosen. It is possible to have English as language and a different localization. In this case the portal will remain in the chosen language and the formatting will change based on the chosen localization.
Time zone - As customers are located worldwide and in different time zones it is possible to add the time zone to reflect this correctly for each user. Time zone can be added by selecting the correct time zone from the drop down list.
Preferred property - When users have access to multiple properties the first property in the list will be shown first. However, it is possible to choose a preferred property. Once the preferred property is added every time the user logs in the preferred property will be shown . If no preferred property is added then the first property in the list will be shown.
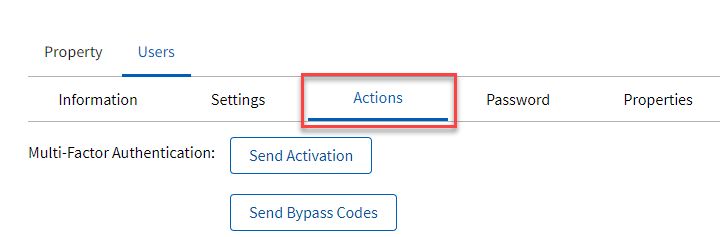
The actions tab holds 2 options, send activation and send bypass codes.
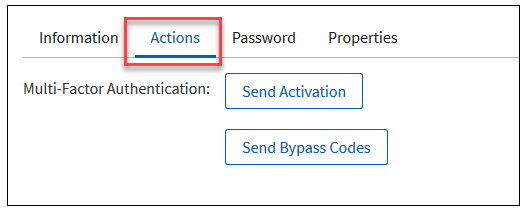
Send activation - In case the user did not receive the DUO activation message on their phone, you can re-send this. Please make sure the phone format is correctly filled, as mentioned in the example and in the explanation above when creating a new user.
Send Bypass codes - ByPass codes
can be send to a user when the user has forgotten its phone at home and
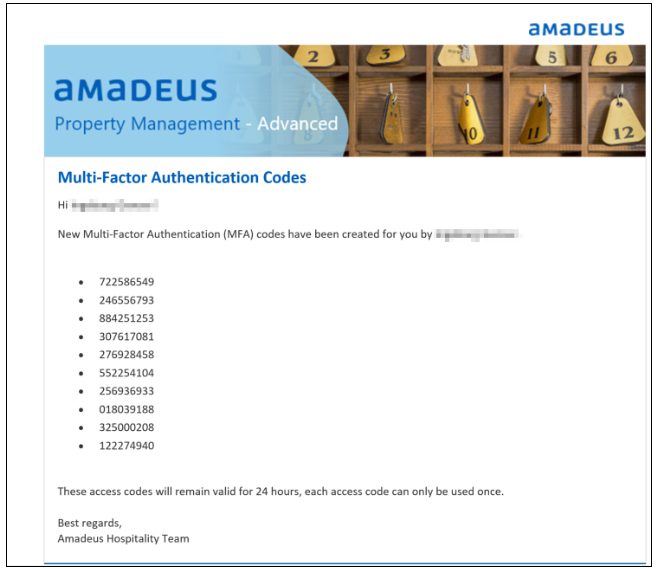
cannot log in. When the bypasss codes are requested the user will receive
an email with a list of 10 access codes which are valid for 24 hours and
these codes can be used to login on to APMA. Each code is valid only once,
every time you are logged out of the APMA portal you need to enter a code
from the code list received in the email to login. If you are out of codes
(all used), you need to request another bypass code list. Bypass codes
can be generated as many times as needed as there is not yet a limit set
for this.
Please note that if the bypass codes are generated multiple times, the
last email with bypass codes received is the valid one. All other emails
previously received with bypass codes are disabled. Bypass codes are created
on device level and not on customer level.
A device can have multiple users linked to it and each user has a different email. It can be that the user logs in with a different email on to the APMA portal and uses bypass codes send to another email. This is possible, however if the bypass codes are not valid anymore and user keeps retrying logging in onto the portal the user can be locked out at DUO. If for any reason the user is locked out, the user can click on forgot password and reset the password and the user should be able to log in after performing the forgot password.
Email received for authentication codes:
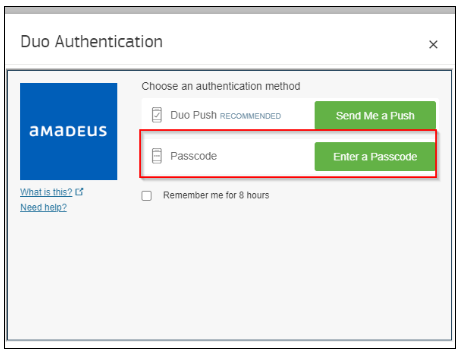
Log in with your email and password as usual onto the portal. When the duo authentication grid appears click on enter a passcode.
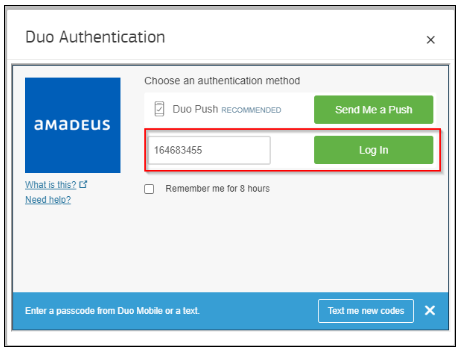
Now you can enter a passcode received in the email. Once the code is added click on log in and the user will be logged in onto the portal. The user will be able to log in on a rdp connection and access the pms system.
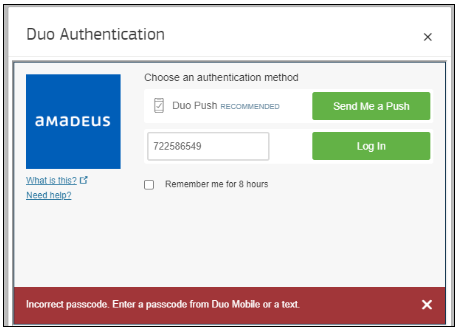
If the code is not correct an error is generated in duo. This could mean that the code was entered incorrectly or that the code has already been used.
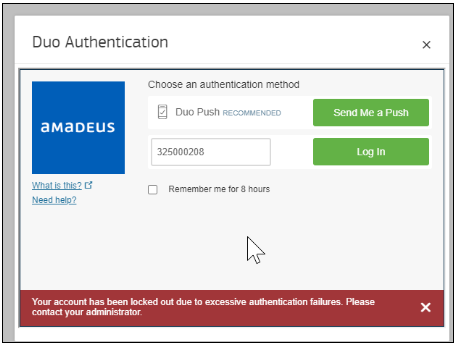
If you have tried several times to log in with access code it can be that your account can be locked out due to authentication failures. If this is the case the user should perform the forgot password and reset password and user should be then able to log in onto the APMA portal.
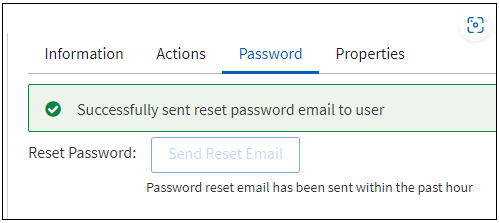
When you are in someone else's profile you can 'Reset' a password. The user will receive an email with a link to reset his password.

When sent, you will see a success message on top of the page and the button will be disabled until you have reset your password.
Edit Linked Properties
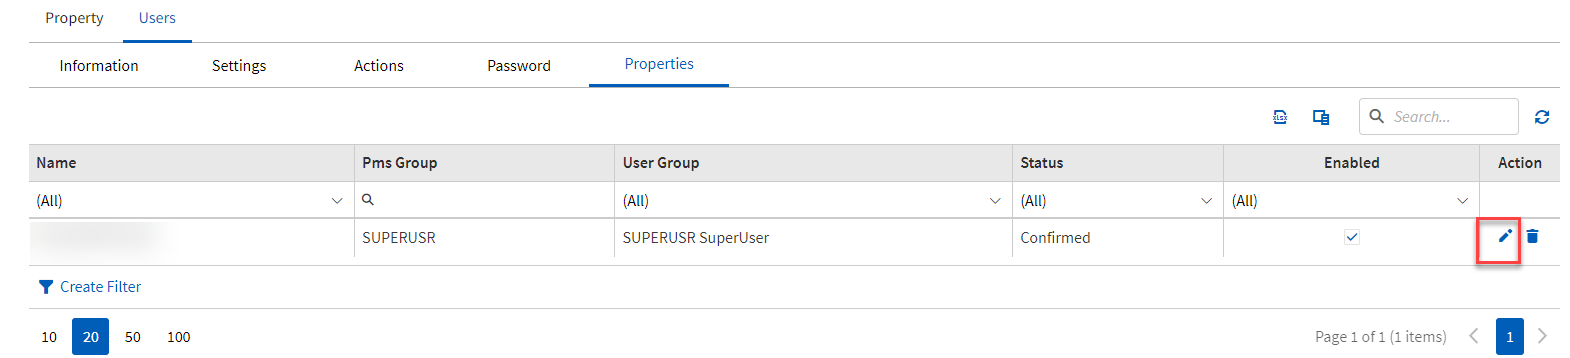
If you want to edit the linked properties for a user, open the user profile, go to properties tab and click on the edit button. A SuperUser is only able to edit the user only if SuperUser has permission to the property.
When clicking on the edit button, a pop-up will open where the property is already selected and greyed-out and here you can edit the PMS group, (Portal) User Group and enable/disable the user for that specific property.
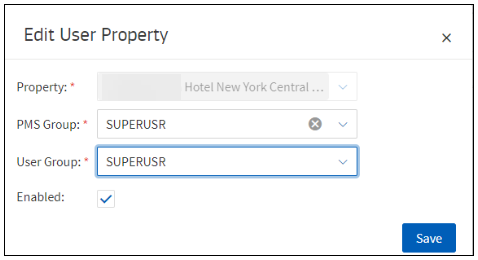
Property - Property is already selected and therefore greyed out
PMS group - By default a drop down list with APMA portal groups will be shown, but you can also create your own PMS user group.
User Group - Select the portal user group from drop down
Enabled - Enable or disable
user.
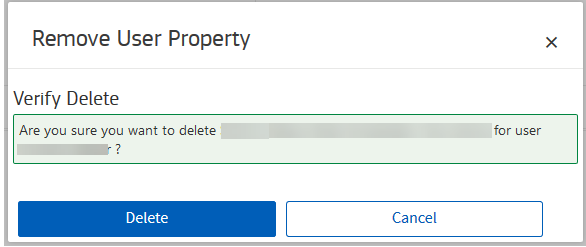
If you want to remove a linked property from a user, open the user profile, go to the properties tab and click the recycle bin. You will be asked for verification. Upon removing a property, the user will receive an email that access to the specific property has been revoked.
To delete a user, go to the user list Settings > Property > Users and here you will see a list of all APMA users. Search for the correct user and then click on the trash bin button to remove the user.
Once you click on the trash bin, a warning message will appear with 'Are you sure you want to delete the user XXX'. If you are sure , click on delete and if not click on cancel.
When a superuser is deleting a user, we will check if the user has multiple properties assigned and if the superuser (who is deleting the user) does not have rights to 1 or more properties of the user who he is deleting, only the linked property will be removed of which the superuser has rights to. This to avoid superusers being able to delete complete APMA user profiles for users who also have other properties assigned (not belonging to the superuser).
Below some example on when you could need the delete user option.
You need to create a new account with the correct email and delete the incorrect one.
Check phone number, is it correct and in correct format. Adjust if needed
in the user profile and save, the save will trigger a DUO message to the
given phone number.
Resend Multi factor authentication activation message from the user profile-
Actions tab.
Send Bypass codes from the user profile- Actions tab. See more info on Bypass codes in the explanation about the different tabs in the user profile.
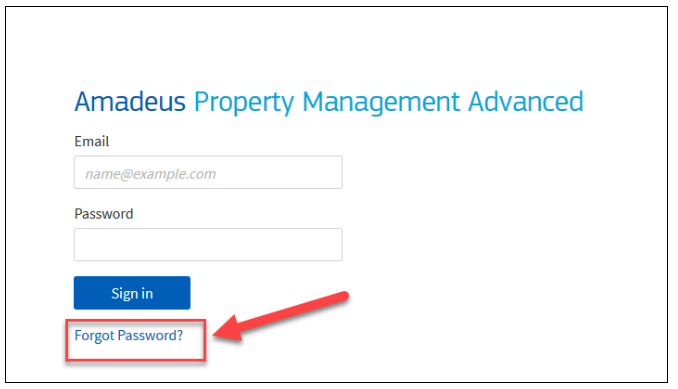
Either direct them to click on Forgot password from the portal login screen or send a reset password from the user profile - Password tab.
Forgot password
Reset password
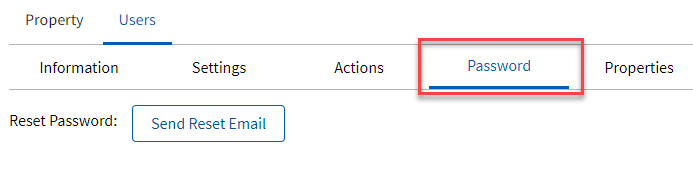
Click in the Send Reset Email button in the user profile password tab.
When the user enters his correct username and password, but his account is locked (due to too many attempts with an incorrect password for example), below message will appear.
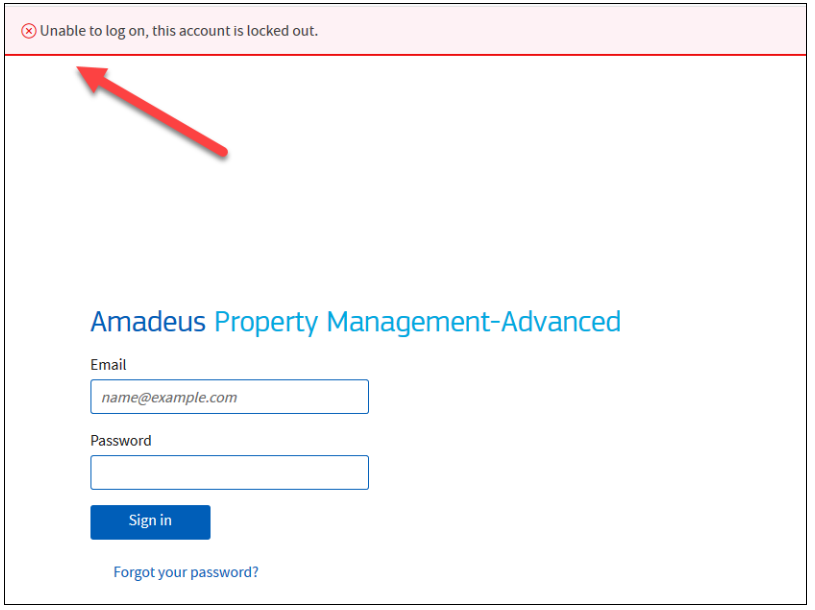
Either click on Forgot password from the portal login screen or ask your SuperUser to send a reset password from the user profile - Password tab
When the user enters his correct username and password, but his account is disabled, below message will appear. The account is disabled and the user will not have access.
User will need to contact his property superUser to undo the disabled action as it might be because of a reason (for example, the user no longer works for this property). Superuser can go into the user profile and set to enabled again in the profile - Properties tab.
Go into the users profile and update the portal group and the PMS group
to the new group in the properties tab.