In step 8 of the mailing wizard one can indicate how the created mailing selection must be saved.
In the left half of this window, one can see which and how many guests qualify for the created mailing. One can choose how this mailing is saved in the right half of this window.
Choosing how the mailing is saved is not necessary. One can also click directly on the `green check mark'. The mailing wizard subsequently creates a file on the `C-disk' of the computer on which the mailing wizard was started. The file can be found under the name MERGEDATA.CSV. The various ways of saving the mailing selection shall be further explained.
Besides saving the created mailing, several other options can be selected in step 8.
The first field on the right half of this window is a `drop-down menu' with the text Remove mailings adjacent to it. By clicking on the down-arrow, the predefined mailings are displayed. If a mailing is selected from this list, the mailing wizard shall remove the guests or companies from the mailing that was just created. These guests shall therefore not be included in the new mailing.
The second field is a `drop-down menu' with the name Add new mailings. By clicking on the down-arrow, the predefined mailings are displayed (if available). If this is not the case, clicking on the icon with the 'three points' can create a new mailing definition. The mailing wizard will subsequently give this icon for all guests who qualify for this new mailing in the guest and company profile under the mailing tab. In this way, this new mailing selection is also saved in IDPMS.
The third field is the field with the name CSV File. Here the name of the mailing concerned can be entered, if applicable. In addition, one can search the `hard disk' of the computer by clicking on the icon with the `three points', after which the mailing is likewise saved.
The fourth field is the field with the name Word document. In this field one can specify a Microsoft Word document to which this mailing selection must be linked. In this way, one can quickly create the letters for the mailing. A link to the mailing details has already been made. These details now only need to be placed in this Word document.
When there is no Microsoft Word installed on the user's pc and export to Microsoft Word will not be possible and the option will be grayed out.
The last field is the field with the name Save definition as. In this field one can enter the name under which this new mailing XE "mailing" is saved in IDPMS. IDPMS shall save this new mailing selection under Settings -> Advanced -> Mailing selections. This new mailing selection can subsequently be selected in step 1 of the mailing wizard when creating the same mailing.
Once the mailing selection XE "mailing selection" has been made, this must, of course, be further processed in a word processor XE "word processor" such as Microsoft Word. How this is done is further explained below.
We assume that the mailing is saved on the `C-disk' under the name MERGEDATA.CSV. If the mailing has been saved in another way, the associated CSV file must be found.
Start the Microsoft Word programme in Windows. Do not do this in IDPMS. Ensure that a new document is opened in Microsoft Word. Click on Merge print in the menu Extra to start this function.
Microsoft Word shall subsequently display the following window.
Merge print
The image may be different depending on the version of MS Office
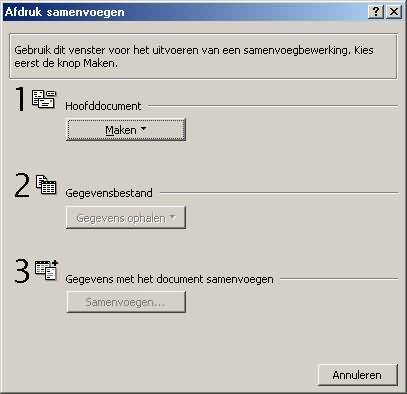
In this window, 1 Master document is chosen for Create -> Standard letters -> Active window.
The option Data is then displayed next to 2 Data files. By clicking on this, one can choose Link data file. A window subsequently appears in which the file MERGEDATA.CSV can be looked up and opened. Finally, Microsoft Word invokes a window in which Edit master document should be selected.
Now, Microsoft Word imports the data and places it in a new toolbar that appears in the window.
Extra word toolbar

Fields can now be inserted in the current document by moving the cursor to the required place. The fields that were just imported are found under the button Insert merge fields.
By clicking on the button with the text <<ABC>>, one can preview what the letter will look like after it has been printed out. This can be subsequently undone by again clicking on this button.
For further support and information in making a mailing, please refer to the Microsoft Word manual and/or the Microsoft support department.